


- How To Use ProTaper Endodontic Files ---------------------------ProTaper geometries:The Endodontic ProTaper
files have a unique features, including:- Changing percentage tapers
over the length of its cutting blades. - The progressively tapered
design replicates the Schilderian Envelope of Motion technique and
servesto significantly improve flexibility, cutting efficiency, and
safety. - They are convex, triangular cross-section, which enhances the
cutting action while decreasing therotational friction between the blade
of the file and dentin.- They have a changing helical angle and pitch
over their cutting blades, which reduces the potential ofan instrument
from inadvertently screwing into the canal.- The noncutting, modified
guiding tip. This feature allows each instrument to safely follow the
securedportion of a canal, while the small flat on its tip enhances its
ability to find its way through soft tissueand debris.- The ProTaper
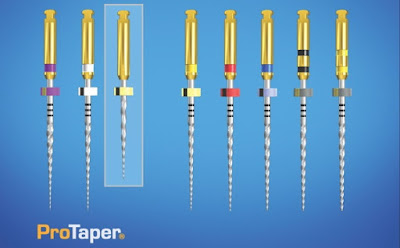
system is comprised of three Shaping and five Finishing
files-----------------------------
- There are two types of files for the ProTaper Endodontic Files;"The Shaping Files" and "The Finishing Files" ...The Shaping Files:- Shaping Files are Two: File No. 1 & File No. 2, Termed S1 & S2, Purple and White Respectively. - The Auxiliary Shaping File, termed SX, has no identification ring on its gold-colored handle and, with ashorter overall length of 19 mm. - The S1 and S2 files have D0 diameters of 0.17 mm and 0.20 mm, respectively, and their D14 maximalflute diameters approach 1.20 mm.- SX File, provides excellent access when space is restrictive. The SX file has a D0 diameter of 0.19 mmand a D14 diameter approaching 1.20 mm. - The Shaping files have increasingly larger percentage tapering, allowing each instrument to engage,cut, prepare and shape the canal, performing its own crown down work. - SX File has a much quicker rate of taper between D1 and D9 as compared to the other ProTaper "Sfiles", it is primarily used after the S1 and S2 files to more fully shape canals in "coronally broken down"or "anatomically shorter" teeth.-------------------The Finishing files:- There are five "Finishing files" named F1, F2, F3, F4, and F5 have yellow, red, blue, double black, anddouble yellow colores corresponding to D0 diameters and apical tapers of 20/07, 25/08, 30/09, 40/06,and 50/05, respectively. - From D4–D14 each instrument has a decreasing percentage taper which serves to improve flexibility,reduce the potential for dangerous taper-lock, and reduce the potential to needlessly overenlarge thecoronal two-thirds.
-
-------------------ProTaper shaping technique: - First, one should know
that: The potential to consistently shape canals and clean root canal
systems issignificantly enhanced when the coronal two-thirds of the
canal is first pre-enlarged, followed bypreparing its apical
one-third.-------------------Scout the coronal two-thirds: - "Hand
files" sizes 10 and 15 are measured and precurved to match the
anticipated full length andcurvature of the root canal. - The 10 and 15
hand files may be utilized within any portion of the canal until they
are loose and asmooth reproducible glide path is confirmed.- The loose
depth of the 15 file is measured and this length transferred to the
ProTaper S1 and S2 files.-------------------Shape the coronal
two-thirds: - The secured portion of the canal can be optimally
pre-enlarged by first utilizing S1, then S2. Prior toinitiating shaping
procedures,- The pulp chamber is filled with a full strength solution of
NaOCl. - Without pressure, the ProTaper Shaping files are inserted into
the canal and follow the glide pathfreely and easily.
- For more optimize safety and efficiency, the Shaping files are used, like a brush, creating lateral space,which will make the Shaping file’s larger, stronger, and of more active cutting blades.- N.B: this brush-cutting action can be used to:Eliminate cervically positioned triangles of dentin,More effectively shape into fins, isthmuses, and canal irregularities, andTo relocate the coronal aspect of a canal away from furcal danger. - N.B: If any ProTaper File ceases inside the secure Portion of the canal, then withdraw it and know thatthe debris blocked the intrablade spaces making the walls push the file away and decrease the cuttingeffeciency.- N.B: Upon removing each Shaping file, visualize where the debris is located along its cutting blades tobetter appreciate the region within the canal that is being prepared. - Following the use of each Shaping file, irrigate, recapitulate with a 10 file to break up debris, and moveit into solution, then re-irrigate.-----------------Scout the apical one-third:- The apical one-third of the canal is fully negotiated and enlarged to at least a size 15 hand file,Working length confirmed, then the patency file is established. - NOW, A decision must be made between whether to finish the apical one-third with rotary or handinstruments. - If, a new size 15 hand file glide easily inside the canal without any interupption, this means that thecanal if of normal shape and having no irrigularities and anatomical morphologies, then the RotaryProTaper will be very good, easy and successfull. - While If, a size 10 or 15 hand files must be precurved and necessitate a reciprocating handle motion,then the Manual ProTaper File is the best and most successful choice.-------------------
-
Shape the apical one-third:- Vigorous irrigation with NaOCl is very
important now, to remove the debris that may decrease theeffect of the
shaping files (discussed befor in "Shape the coronal two-thirds"
section), to avoid blockageof canals and facilitate the shaping
proccess.- The ProTaper sequence is to carry the S1, then the S2, to the
full working length.- Float, follow, and brush (discussed befor in
"Shape the coronal two-thirds" section) until the terminusof the canal
(Apical Foramen) is reached.- S1, then S2, will typically move to length
in one or more passes depending on the length, diameter,and curvature
of the canal.- Following each ProTaper file, irrigate, recapitulate with
a size 10 file, then re-irrigate. - After using the Shaping files,
particularly in more curved canals, working length should bereconfirmed,
as a more direct path to the apical foramen has been established,
leading to decreaseworking length.- The preparation can be finished
using one or more of the ProTaper Finishing files in a
non-brushingmanner. - The F1 is selected and passively allowed to move
deeper into the canal, in one or more passes, untilthe terminus is
reached. - Apical flutes are inspected, and if they are loaded with
dentin, then visual evidence supports, theshape is cut.- After using the
F1 file, Irrigate with NaOCl, recapitulate, confirm patency, then
re-irrigate to liberatedebris from the canal.-------------------ProTaper
finishing criteria: - Following the use of the Protaper File F1, the
ProTaper Finishing Criteria is to gauge the size of theforamen with a
Manuale file 20 to determine if this instrument is snug or loose at
length, If the 20 hand
- file is snug at length, then the canal is fully shaped and, if irrigation protocols have been followed, readyto pack. - if the 20 hand file is loose at length, then gauge the size of the foramen with a 25 tapered hand file. Ifthe 25 file is snug at length, then the canal is fully shaped and ready to pack. - If the 25 file is short of length, proceed to the Protaper File F2 and, when necessary, the Protaper FileF3, the Protaper File F4, and the Protaper File F5, gauging after each ProTaper Finisher with the same D0correspondingly sized hand file.- If the 50 hand file is loose at length, then use alternative NiTi rotary or manual files to finish the apicalextent of these larger, easier, and more straightforward canals


